dockAPEX - Dockerize your world Oracle APEX Stack
published on
Numerous articles about Docker and Oracle APEX are floating around the web - this article is intended to add to the topic from a slightly different perspective. I started developing dockAPEX a long time ago. Back then, the tool was still called dockAWEX because I was able to provision a complete Docker-based environment in AWS with the help of docker-machine - which unfortunately no longer exists nowadays. Today, the tool is called dockAPEX and essentially consists of a single shell script. But what exactly is it all about?
Basically, the structure of an Oracle APEX environment always looks quite similar: We need a database, APEX must be installed, the Oracle REST Data Service (ORDS) is required - and depending on the setup, an application server or a proxy server is added. Often APEXOfficePrint (AOP) is also included to generate PDF documents or other formats.
The differences usually lie in the details - for example, whether it is a development, test or production environment. Or whether all components are to run on a single host or are distributed across several. However, the basic setup always remains similar - depending on the respective project or the customer's requirements.
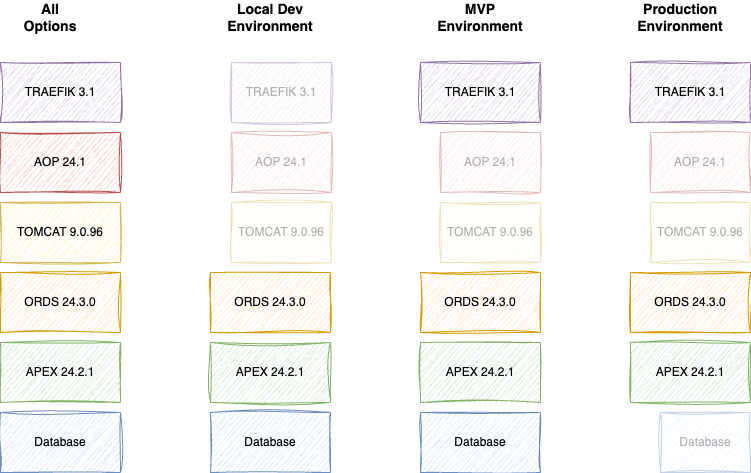
With dockAPEX, the preferred environment can be easily configured using a single environment file. Depending on which containers or services are required - such as Database, APEX, ORDS, Tomcat, AOP or Traefik - the respective component is simply set to true in the environment file using a switch.
Additional settings such as Versions, Patchsets or other Parameters for fine-tuning are also defined centrally at this point. This allows the setup to be flexible and project-specific.
An example: If the database service is supposed to run as a container, you can also specify in the environment file that a second PDB is to be additionally created or cloned. This second PDB can then be ideally used as a build or test environment - for example, to check deployments in advance or to apply new releases in a controlled way.
Installation - so how do you get started?
dockAPEX is open source and is provided on GitHub (https://github.com/MaikMichel/dockAPEX). It is recommended to integrate the tool directly into your own project as a Git submodule - so you can easily pull the latest version directly from the repository at any time.
In this way, GitHub acts more or less like a Package Manager, similar to what you know from the Node.js world with NPM. The tool is kept cleanly versioned and always up-to-date without losing track of local customizations.
# creates the instancefolder, makes it a git repo and adds dockAPEX as submodul
$ curl -sS https://raw.githubusercontent.com/MaikMichel/dockAPEX/main/install.sh | bash -s
The manual way:
# create a folder belonging to your project
$ mkdir -p demo

# change into it
$ cd demo

# make the folder a git project / repo
$ git init

# clone dockAPEX as submodule"
$ git submodule add https://github.com/MaikMichel/dockAPEX.git .dockAPEX
For operation, dockAPEX requires two central files: an environment file and a password file. The passwords stored in these files are later made available in the respective containers as secrets. Of course, these files can also be created manually - but it is much easier with the following command:
.dockapex/dpex.sh demo.env generateThis automatically creates two files: demo.env for the configuration and demo.sec for the passwords. Both contain all relevant parameters that can be adjusted as required. At the same time, the *.sec file is also added directly to .gitignore - because sensitive data has no place in version management.
For a local development environment, it is often sufficient to simply activate DB, APEX and ORDS in the environment file - and a complete environment is ready for development.
# ========================================================
#  _____       _______       ____           _____ ______
# |  __ \   /\|__   __|/\   |  _ \   /\    / ____|  ____|
# | |  | | /  \  | |  /  \  | |_) | /  \  | (___ | |__
# | |  | |/ /\ \ | | / /\ \ |  _ < / /\ \  \___ \|  __|
# | |__| / ____ \| |/ ____ \| |_) / ____ \ ____) | |____
# |_____/_/    \_\_/_/    \_\____/_/    \_\_____/|______|
#
# ========================================================

# Enable DB Service
DB=true

# Vars to connect to and / or create the service
DB_USER="sys"
DB_HOST="database"
DB_PORT="1521"
DB_NAME="freepdb1"

# ========================================================
#           _____  ________   __
#     /\   |  __ \|  ____\ \ / /
#    /  \  | |__) | |__   \ V /
#   / /\ \ |  ___/|  __|   > <
#  / ____ \| |    | |____ / . \
# /_/    \_\_|    |______/_/ \_\
#
# ========================================================

# Enable APEX Service
APEX=true

# Build ARGS, when build the image by your own
APEX_VERSION=24.2
APEX_FULL_VERSION=24.2.0
APEX_URL="https://download.oracle.com/otn_software/apex/apex_${APEX_VERSION}_en.zip"

...

#   ____  _____  _____   _____
#  / __ \|  __ \|  __ \ / ____|
# | |  | | |__) | |  | | (___
# | |  | |  _  /| |  | |\___ \
# | |__| | | \ \| |__| |____) |
#  \____/|_|  \_\_____/|_____/
#
# ========================================================
ORDS=true

# BUILD ARGS
ORDS_FULL_VERSION="24.4.0.345.1601"
ORDS_VERSION="24.4.0"
ORDS_URL="https://download.oracle.com/otn_software/java/ords/ords-${ORDS_FULL_VERSION}.zip"

ORDS_PORT="8080"

...
Especially in local development, it is also worth activating the second PDB. This can be used for deployment tests, for example, without affecting the main environment. ORDS then automatically controls this additional PDB via a separate path - for example via: http://localhost:8080/ords/build/…
This makes it easy to distinguish between regular development operations and test deployments - without the need for separate setups or additional infrastructure.
...
# Do we need a copy of PDB1?
APEX_SECND_PDB=true
APEX_FIRST_PDB_TBL_SPACE="/opt/oracle/oradata/FREE/FREEPDB1"
APEX_SECND_PDB_TBL_SPACE="/opt/oracle/oradata/FREE/FREEPDB2"
APEX_SECND_PDB_POOL_NAME="build"
APEX_SECND_PDB_NAME="freepdb2"
...
If you have the option of configuring a subdomain via a DynDNS service, another practical solution opens up: the use of a reverse proxy with Traefik.
Traefik takes over the routing and makes the environment conveniently accessible via a speaking URL. After installing ORDS, the IP address of the caller is automatically stored in the DynDNS service via curl, so that the domain always points to the correct instance - without any manual readjustment.
#  _______ _____            ______ ______ _____ _  __
# |__   __|  __ \     /\   |  ____|  ____|_   _| |/ /
#    | |  | |__) |   /  \  | |__  | |__    | | | ' /
#    | |  |  _  /   / /\ \ |  __| |  __|   | | |  <
#    | |  | | \ \  / ____ \| |____| |     _| |_| . \
#    |_|  |_|  \_\/_/    \_\______|_|    |_____|_|\_\
#
# ========================================================
TRAEFIK=true
TRAEFIK_VERSION=3.3
TRAEFIK_DEFAULT_ROUTE="ords/r/dockapex/demo"
TRAEFIK_DOMAIN="dockapex.examplde.com"
TRAEFIK_DASHBOARD=true
If, for example, you use a database service in the Oracle Cloud Infrastructure (OCI) or operate your own dedicated database server, the database container does not necessarily have to be started. In this case, you can simply set the DB service to false in the environment file and instead specify the connection parameters to the external database directly.
This means that the setup remains flexible and can be easily adapted to existing infrastructure - whether local, in the cloud or hybrid.
# Enable DB Service
DB=false

# Vars to connect to and / or create the service
DB_USER="sys"
DB_HOST="1.2.3.4" # just an example IP
DB_PORT="1521"
DB_NAME="your.service.name.is.here"
How does it work?
In essence, dockAPEX uses the possibilities of Docker Compose - more precisely the function of combining several Compose files with each other. A complete configuration is dynamically assembled based on the information in the environment file. This creates a flexible setup that can be controlled modularly.
Every instruction or command that is executed after the environment file is passed on one-to-one to docker-compose. This means that anyone already working with Docker Compose will find their way around immediately - just with the addition of convenient control by dockAPEX.
.dockAPEX/dpex.sh demo.env logs -f
If you want to view the completely assembled Docker Compose configuration, a simple command is sufficient:
.dockAPEX/dpex.sh demo.env configThis displays the effective compose file - i.e. the result of all combined configuration blocks. Here too, dockAPEX remains very close to the Docker Compose standards.
Most commands are passed through directly, but there are a few dockAPEX-specific extensions:
genfiles- as mentioned above, this command automatically creates the environment and password files.clear- ensures a complete cleanup process: stop containers, delete containers, remove images, delete volumes - effectively a hard reset for the environment.
And if you get stuck: Simply call the command without arguments - then a help overview with all available options appears automatically.
Please call script by using all params in this order!
    .dockAPEX/dpex.sh env-file genfiles|clear|compose-comand
-----------------------------------------------------

  commands:
    genfile > creates an .env and .sec file based on all known vars
    clear   > removes all container and images, prunes allocated space

    compose-comand   > redirected to docker-compose

-----------------------------------------------------

  examples:
    .dockAPEX/dpex.sh demo.env genfiles
    .dockAPEX/dpex.sh demo.env up --build --detach
    .dockAPEX/dpex.sh demo.env ps -a
    .dockAPEX/dpex.sh demo.env down
    .dockAPEX/dpex.sh demo.env clear

-----------------------------------------------------
The individual components or services are - if activated - dependent on each other. This means that APEX only starts when the database reports the status healthy. Similarly, ORDS waits for APEX before starting itself - of course only if APEX is also part of the environment.
This clean start sequence ensures that each component only starts when its respective dependencies are fully ready and functional. For example, the database can first perform an update or setup at startup before other containers become dependent on it. This makes the entire setup more stable, robust and error-resistant - especially in the case of automated deployments or frequent restarts of the environment.
Updating components
The special feature of this concept is that APEX, ORDS and AOP each have a dedicated update mechanism. This checks directly in the target database which versions are already installed and takes care of installing or updating them if necessary.
When the APEX container is started, for example, it checks whether APEX already exists in the database. If so, it also checks whether an update to the version specified in the environment file is required. The same applies to ORDS and the database components of AOP.
So if you now want to update APEX in your DB, it is sufficient to stop the container and start it with a new version.
# stop and remove apex service
.dockAPEX/dpex.sh demo.env down apex

# remove apex image (apex_(APEX_FULL_VERSION):demo)
docker rmi apex_24.2.3:demo

# now modifiy the version identifier and optionally update the URL to the patchset

# and just build and start the service
.dockAPEX/dpex.sh demo.env up apex --build --detach
IMPORTANT: The solution is open source and completely sufficient for smaller productive applications. You still need to know what you are doing. No support is available here.